Brian Vander Plaats
Developer
Blog
Developer
Here’s a handy excel formula to remember:
=CONCATENATE(CHAR(39),A2, " ", B2, CHAR(39), CHAR(44))
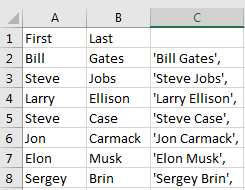
For quickly generating a list of queryable list of names:
Select * from dbo.Person
where Name in
(
'Bill Gates',
'Steve Jobs',
'Larry Ellison',
'Steve Case',
'Jon Carmack',
'Elon Musk',
'Sergey Brin'
)
This can be handy if you get spreadsheets from people and want to quickly filter results in the database. I did this today for someone who wanted a list of user names for about 40 people, far too many to spend half an hour typing these in!
The Visual Studio new project template is a handy wizard for setting up AD FS on a new site, but the wizard isn’t available for existing sites. Additionally, the wizard forces you to include ASP.NET MVC components, even if you just need to set up a Web API back-end. This post shows you how to do this manually.
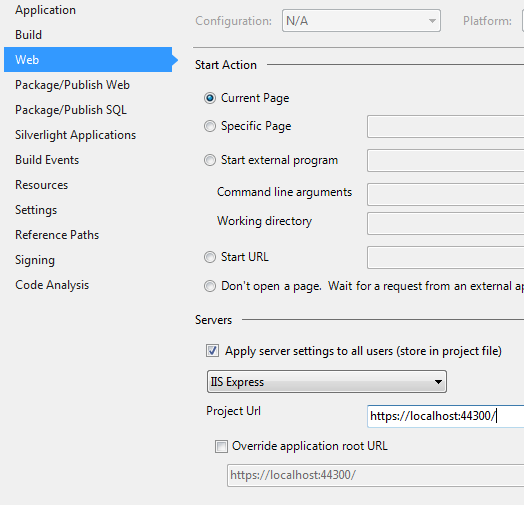
Make sure SSL is enabled in your project.
Set The SSL URL to the one provided by your AD FS administrator, or configure AD FS to use your website url/port. e.g. https://localhost:44300/
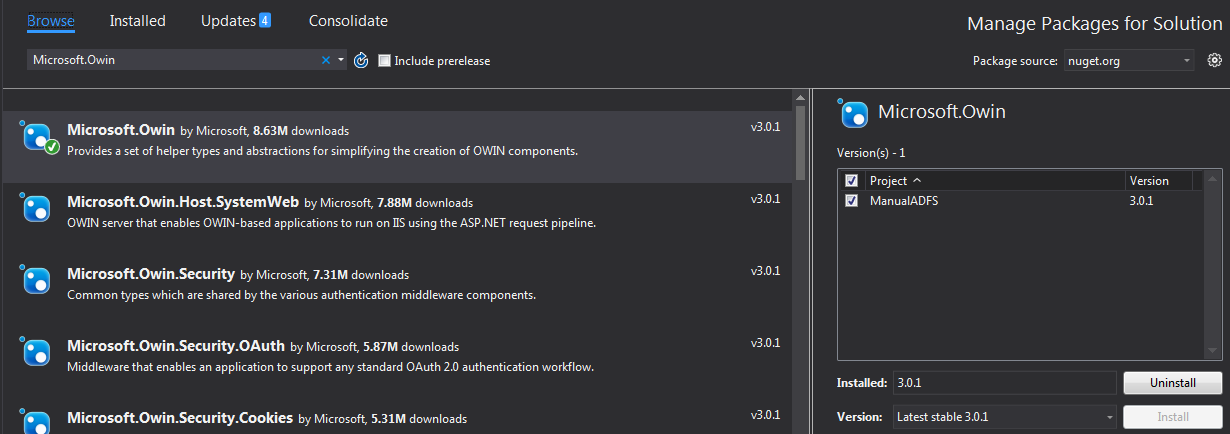
Microsoft.OwinMicrosoft.Owin.SecurityMicrosoft.Owin.Security.CookiesMicrosoft.Owin.Security.WsFederationMicrosoft.Owin.Host.SystemWebWeb.config<appSettings>
<add key="ida:ADFSMetadata" value="https://example.com/federationmetadata/2007-06/federationmetadata.xml" />
<add key="ida:Wtrealm" value="https://localhost:44300/" />
</appSettings>
Add a Startup.cs file/class if it does not already exist
Add configuration hooks to Startup.cs. Note that if you have not added Microsoft.Owin.Host.SystemWeb to your packages Startup.Configuration() will not fire.
public void Configuration(IAppBuilder app)
{
    ConfigureAuth(app);
}

private void ConfigureAuth(IAppBuilder app)
{
    app.SetDefaultSignInAsAuthenticationType(CookieAuthenticationDefaults.AuthenticationType);
    app.UseCookieAuthentication(new CookieAuthenticationOptions());
    app.UseWsFederationAuthentication(
        new WsFederationAuthenticationOptions
        {
            Wtrealm = ConfigurationManager.AppSettings["ida:Wtrealm"],
            MetadataAddress = ConfigurationManager.AppSettings["ida:ADFSMetadata"]
        });
}
Method 1: Set global filter
  public static void Register(HttpConfiguration config)
  {
      ...

      // Authorize all api routes
      config.Filters.Add(new AuthorizeAttribute());

      ...
  }
Method 2: Add Authorize Attribute to controller
  [Authorize]
  public class PersonController : ApiController
  {
      ...
  }
While user authentication is a key component of AD FS, the returned user claims are powerful tools for client applications.
There are two ways to add to the available claims:
Before going into details here, a few high level points to keep in mind:
https://apps.example.comThus, your application should never assume that a claim exists.
An excellent usage of claims information is populating the application security roles the user has access to. This is information that will be checked frequently during the applications lifetime, and querying a security database on each access is inefficient.
To begin, you will need a security database with users/roles/groups etc. At my company we use the venerable ASPNETDB database that has been part of the asp.net membership system for a long time.
Adding the claims is done in the ConfigureAuth() method. In a vanilla configuration, this looks as follows:
app.SetDefaultSignInAsAuthenticationType(CookieAuthenticationDefaults.AuthenticationType);

app.UseCookieAuthentication(new CookieAuthenticationOptions());

app.UseWsFederationAuthentication(
    new WsFederationAuthenticationOptions
    {
        Wtrealm = realm,
        MetadataAddress = adfsMetadata
    });
Adding claims is done by specifying additional items in WsFederationAuthenticationOptions
app.UseWsFederationAuthentication(
new WsFederationAuthenticationOptions
{
    Wtrealm = realm,
    MetadataAddress = adfsMetadata,
    Notifications = new WsFederationAuthenticationNotifications
    {
        SecurityTokenValidated = context =>
        {
            string accountName = "";
            foreach (var claim in context.AuthenticationTicket.Identity.Claims)
            {
                if (claim.Type == ClaimTypes.Upn)
                {
                    accountName = claim.Value;
                }
            }

            //Query roles for user from security database
            string[] stringRoles = { "TestRole1", "TestRole2", "TestRole3", "TestRole4" };
            var roles = stringRoles.Select(s => new { RoleName = s });

            //loop through returned roles, and add
            foreach (var role in roles)
            {
                context.AuthenticationTicket.Identity.AddClaim(
                                                    new Claim(ClaimTypes.Role, role.RoleName));
            }

            return Task.FromResult(0);
        }

    }
});
}
Basically we specify an event handler to fire as soon as the claims token exists. Note while this is configured in startup.auth.cs, this code only runs when the user signs in. This means that if you change which roles the user has in the database, or in Active Directory, the user will not see these roles until they logout, and signs in again.
The first step is getting the user identity we will use to retreive user roles - the user name is a good option here, but you could use a number of claims (again, based on what the AD FS adminstrator configured)
brianvpbrianvp@example.combrian.vanderplaats@example.comNext, you will take your chosen identifier and query your security database.
Then, iterate through these roles, and add to the claims collection using the AddClaim() method. Make sure to specify ClaimTypes.Role. The actual role name is simply a string. Note that if you specify a role twice, it will be added twice. This should not be a problem with multiple applications, as again, this handler does not fire on app startup, only during the sign-in process. Once the user is signed in to an application on a domain, they will not need to sign in to other applications on the domain.
Now that the roles are added, you need to configure your application to use them. The simplest way is to combine roles into [Authorize] tags on your controllers. For example, you could lock down your editor pages by placing the role over create/edit controller actions, but not over the view actions:
public ActionResult Details(int? id)
{
    ...
}

[HttpPost]
[ValidateAntiForgeryToken]
[Authorize(Roles = "ModelEditorRole")]
public ActionResult Create( Model model)
{
    ...
}

[Authorize(Roles = "ModelEditorRole")]
public ActionResult Edit(int? id)
{
    ...
}
Another way is to look at the user’s current roles while performing an action inside a method. This can be done by iterating through the user’s claims:
bool inTestRole4 = false;
var claims = ((ClaimsIdentity)Thread.CurrentPrincipal.Identity).Claims;
foreach (var claim in claims)
{
    if (claim.Type == ClaimTypes.Role && claim.Value == "TestRole4")
    {
        inTestRole4 = true;
        break;
    }
}
Or, even easier, you can use the simple check:
if(User.IsInRole("TestRole4"))
{

}
Adding a custom claim is basically the same as adding a role claim. Instead of specifying ClaimTypes.Role, you give it your own name / value:
SecurityTokenValidated = context =>
{
    var accountName = context.AuthenticationTicket.Identity.Claims.Where(x => x.Type == ClaimTypes.Upn).FirstOrDefault().Value;

    //do something to retrieve appropriate value for current user
    int CompanyUserID = 4000333;

    context.AuthenticationTicket.Identity.AddClaim(new Claim("CompanyUserID", CompanyUserID.ToString()));

    return Task.FromResult(0);
}
Again, a good candidate for these claims are broad, static bits of information that will not change, or at least the frequency of change should be much longer than the typical claims token expiration period (as the new value would not be received until next user login).
This post demonstrates how to set up a new ASP.NET MVC project using AD FS. Before you can do this, you need to have an AD FS Server up and running. In my testing, I used an on-network AD FS Server, but a cloud / azure AD FS option exists as well (but I haven’t worked with at this point).
You will need a few pieces of information from your AD FS administrator before proceeding:
https://example.com/federationmetadata/2007-06/federationmetadata.xmlhttps://localhost:44300/, but this must be configured on the AD FS side as well. If you specify something else it will not work!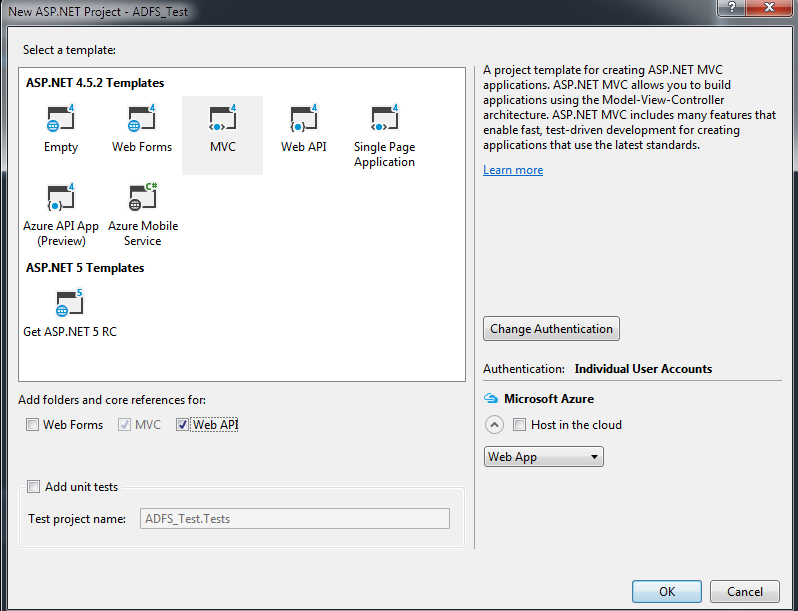
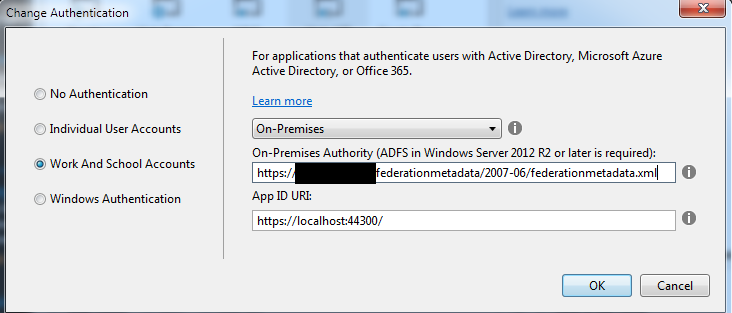
Open up your project settings, and change the SSL URL to match the one from your AD FS administrator
By default, your entire project requires authentication, so on your first build & run, you will immediately see the login screen. To see the home page before logging in, remove the [Authorize] filter from HomeController
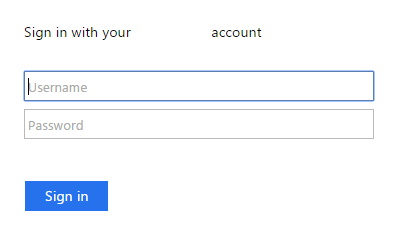
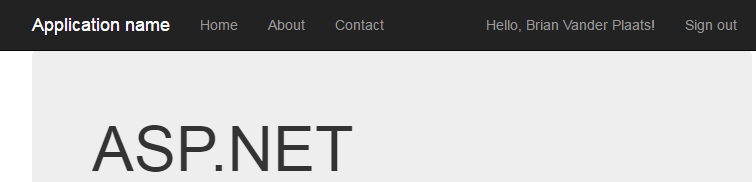
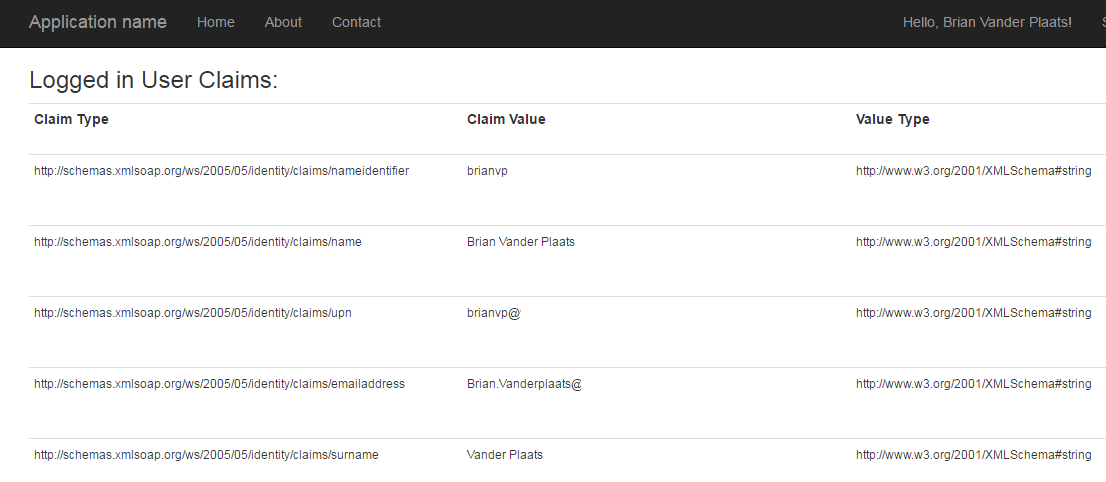
Build and run your project. You should see the following:
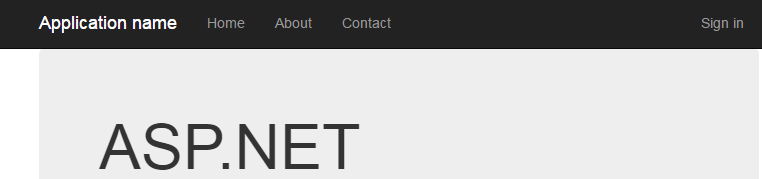
click sign in - you will be redirected to your AD FS Server’s login page. Note that this is not your website
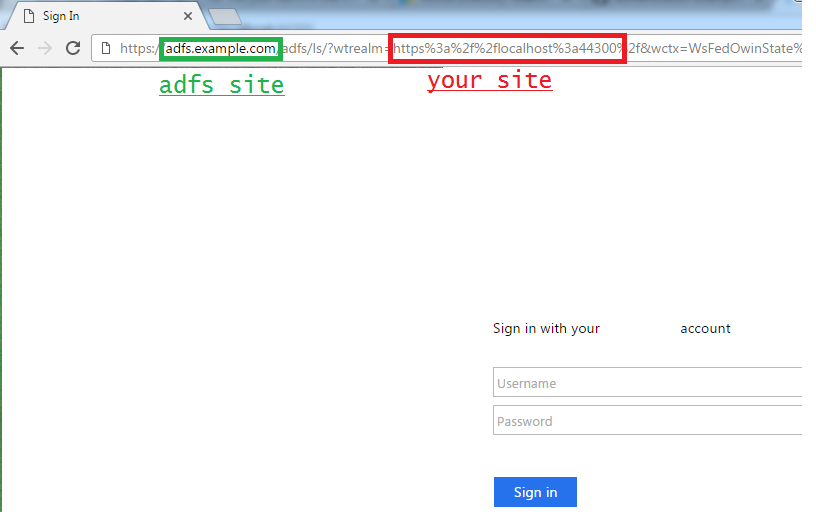
Once you sign in, you will automatically redirect back to your sample website. Note that if any metadata is misconfigured (on the AD FS Server or in your project), you will start to see problems here.
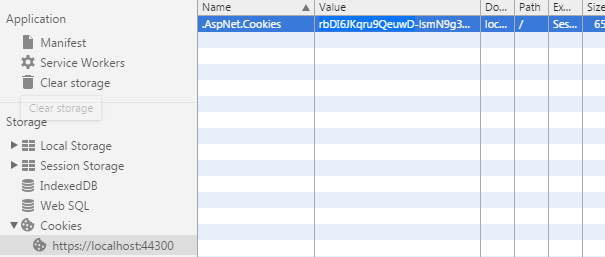
You are now signed in until you explicitly sign out, or your claims token expires (claim expiration is controlled by your server administrator). The claim token itself is stored in a cookie, and sent with each request to the server
Click Sign Out - you will be directed to the sign out page on your AD FS Server, and then immediately redirect back to your website. This does a few things:
https://adfs.example.com/adfs/ls/?wtrealm=https%3a%2f%2flocalhost%3a44300%2f&wa=wsignout1.0&wreply=https%3a%2f%2flocalhost%3a44300%2fAccount%2fSignOutCallback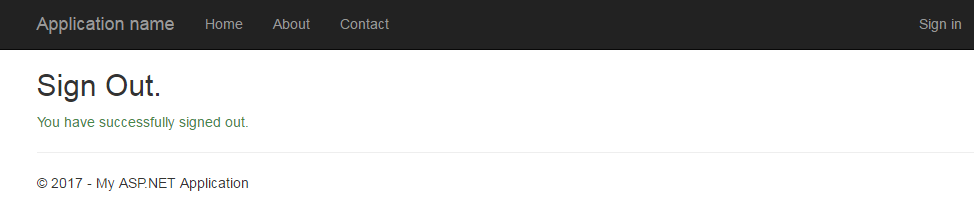
You can access your claims token by casting Thread.CurrentPrincipal.Identity to a ClaimsIdentity and then accessing the Claims collection.
HomeController.cs
 public ActionResult Index()
{
    ViewBag.ClaimsIdentity = Thread.CurrentPrincipal.Identity;

    return View();
}
index.cshtml
<h3>Logged in User Claims:</h3>
<table class="table table-condensed">
    <tr>
        <th>Claim Type</th>
        <th>Claim Value</th>
        <th>Value Type</th>
        <th>Subject Name</th>
        <th>Issuer Name</th>
    </tr>
    @foreach (System.Security.Claims.Claim claim in ViewBag.ClaimsIdentity.Claims)
    {
        <tr>
            <td><small>@claim.Type</small></td>
            <td><small>@claim.Value</small></td>
            <td><small>@claim.ValueType</small></td>
            <td><small>@claim.Subject.Name</small></td>
            <td><small>@claim.Issuer</small></td>
        </tr>
    }
</table>
That’s it! You now have a site that you can lock down to authenticated users only. Simply add [Authorize] tags to the necessary feature controllers, and don’t forget to secure all your api paths! To add role-based security for additional granularity, you can add roles to the claims token itself, which I will go over in a future post.
This is the first in a series of posts going over the use of Active Directory Federation Services (AD FS). For roughly the past year, I’ve been exploring authentication options for an external website project at work. Previously we focused on using Windows Authentication, but that only really works for Intranet applications, and not so well or at all on mobile / tablet environments. Since this application is only for employees, I wanted to use existing Active Directory resources. I briefly explored oAuth as an option, but since we would not be using google/facebook etc for credentials, setting up our own oAuth provider seemed to be as much or more work than utilizing AD FS. Specifically my design goals were:
Early last year, I created two demo projects, one using oAuth, and the other using AD FS. Both were successful, but the oAuth solution is using google, so after reviewing with my other developers we decided to use AD FS. At present, we have two live applications using AD FS, and so far has worked out really well. Below are the demo projects for reference:
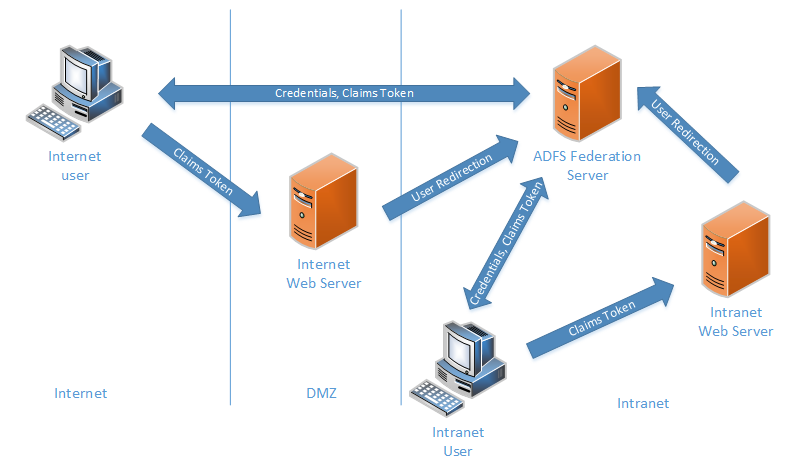
The rest of this post describes key points of the AD FS architecture
Active Directory Federation Services is a service that allows sharing identity information between “trusted” partners, called a “federation”. At a high level, it allows a website to delegate authentication to a trusted service, and accept a “claim” from this service on the user’s behalf to make authorization decisions. For example:
Additionally, the claims token is typically stored in a cookie, so if John closes his browser and reloads the payroll site, it can use the existing claims token without requring John to re-log in to AD FS.
Some key terminology:
Below is a simplified view of what my current AD FS system looks like