Brian Vander Plaats
Developer
Blog
Developer
Today I found myself needing to brush up on some functional programming concepts in JavaScript, namely the map(), filter(), and reduce() array methods. I found a good primer and went through the examples.
var namesMapMethod = names.map(function(name){
    return name.toUpperCase();
});
additionally, you can change multiple .map() functions together
var namesChained = names.map(function(name){
    return name.toUpperCase();
}).map(function(name){
    return name.replace('A', '@');
});
var filtered = names.filter(function(name){
    return (name.indexOf('a') > -1);
});
var nameString = names.reduce(function(result, name){
    return result + name + "-";
}, "");
demo:
Learning a new framework like Angular2 brings up a large number of technical items that you end up using, but not necessarily understanding right away. For example, a simple DataService had me implement the following code:
getModels(): Promise<Model[]> {
    return Promise.resolve(MODELS);
}
Even though this is a mock object, it is good practice to assume that data operations may take some time - enough where async operations come into play.
Wanting to understand a bit more, I did some quick research and a demo on promises. Here’s what I found out: much of this from MDN
resolve and rejectresolve or reject functions are be called.resolve is called, the then function is called on the promise. The promise is considered fulfilledreject is called, the catch function is called on the promise, and is considered Rejectedthen always returns a promise, whether one is explicitly created or not. The implicit promise essentially resolves immediatelyvar promise = new Promise(
function(resolve, reject) {
//some sort of long running / async operation
if (true) {
resolve("success");
}
else {
reject("failure");
}
}
);
promise.then( // called when resolve() executed
function(result) {
console.log("Success: " + result);
})
.catch( //called when reject() executed
function(reason) {
console.log("Failure: " + reason );
});
Here is an example JS Fiddle I wrote that demonstrates promises and promise chaining:
This article demonstrates a “complex” edit page in Angular. I’ve created a demo page using JSFiddle.
So what makes an editing page “complex”? In my experience complexity begins whenever you have two or more non-lookup entities on a single page or view. This is primarily due to issues regarding state, foreign key management, and additional bindings. The most common scenario is with the parent-child (master/detail) relationship. In this example I model a common product pattern with model-sku. For many products it is typical to have a basic model that comes in a number of different configurations and sizes. It is important that we can uniquely identify a specific product size for sales, shipping, and inventory purposes. At the same time, we want to group related part numbers together under a common “model” so that they can share descriptions, images, pricing, categories, etc.
Other common parent-child relationships
The core structure of the page is similar to the Simple Edit Page. The flexiblity of JSON objects to contain arrays of objects makes binding much simpler. We simply need a reference to $scope.model, and optionally $scope.modelPrior. The part numbers are stored as an array of objects here $scope.model.partNumbers. Binding this inside the view is simple, via ng-repeat="partNumber" in model.partNumbers" Once again the beauty of this approach is that we can operate on model without direct knowledge of how the view renders each part number. For example, deletePartNumber() simply removes a part number from the array. It doesn’t need to do a DOM lookup for that row and remove markup - we just adjust the data and angular re-binds the table (instantly I might add).
There is some work to do with managing the detail records.
The most important principle with parent-child relationships is that all changes made should be atomic. A simplistic system might implement separate db/service calls for editing individual records, but this doesn’t allow the user to makes changes, then change their minds and cancel. It also creates the problem of partial updates because of system issues. What if the user enters invalid data into the 20th row of a detail screen, causing the system to crash after processing the previous 19 records? With Angular data binding this is pretty easy to avoid, at least at the client level (the service layer still needs to consider transactions).
There are two general approaches for creating a new line row. First, we can simply add a new, empty partNumber to the model.partNumbers collection. I don’t like that approach however, as it complicates the binding in the ng-repeat section. Additionally, when we go to persist the model, we will either need to strip out the blank row, or the service layer will need to check for blank values. The second approach is to add a <tr> below the ng-repeat, and create a placeholder object for binding, newPartNumber. On page load or when the user clicks the add button, newPartNumber is loaded with blank values.
It is also important to assign a temporary key to the part number. This serves two purposes. One, it signals to the business layer that these are records that need to be inserted, and secondly it gives us a handle for removing the new record.
As mentioned earlier, removing a part number is as simple as removing it from the array. To do this, we place a delete button on each row. The delete button will reference the deletePartNumber() function. Angular binding is quite elegant here. Each ng-click references the part number to delete via databinding:
<button class="editButton" ng-class="pageMode" ng-click="deletePartNumber(partNumber.partNumberId)" ng-show="partNumber.flagCanDelete === true">Delete</button>
However, we should also consider when it is appropriate to remove a part number. A good rule of thumb is that an entity can be removed if it hasn’t been used as part of another relationship - i.e. the part number has not been sold, purchased, etc. To simulate this, I’ve marked some of the part numbers as not eligible for deletion. The ng-show above takes advantage of this and hides the delete button. Remember that the service layer should also enforce this rule - this is just a UI convenience.
Both the model and part number areas are part of the same <form>, the advantage being that the save operation can check a single global $valid state. For this example I’ve put required attributes on several of the part number fields. When these are empty, the form state is updated to be invalid, which in turn disables the save operation using ng-disabled
I was pleasantly surprised to see how straightforward a parent-child relationship can be implemented in Angular.
As of yesterday my blog is being hosted by GitHub Pages, using the Jekyll static page engine. I’ve been using Wordpress hosted on a DigitalOcean droplet for the past year, and I haven’t been happy with the platform. Stability was a major concern, and the blog authoring didn’t suit technical blogging very well. And finally, Github Pages + Jekyll has some seriously cool features.
Over nine months, my site was down for at least twice a week. Not cool. As best as I can tell, my instance was running out of memory, which is ridiculous for a low traffic site…
Error Establishing Database Connection
ugh.
Initially I was very exicted about using WordPress. DigitialOcean uses the concept of “droplets”, that can be loaded with a number of Linux server configurations. I chose the $10/mo option, which gave me 1GB memory, 1 processor core, and a 30GB SSD. Surely enough for a personal blog? Unfortunately, within a month or two of running the new site, it started going down, frequently.
The first thing I noticed was a large number of “xmlrpc” attacks
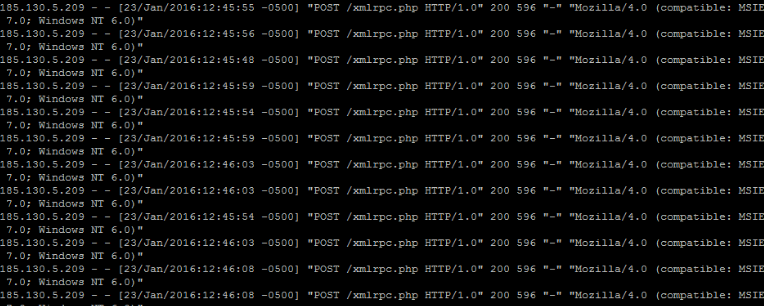
The XML rpc service is used to upload posts to wordpress from clients. As best as I can gather, these requests were flooding the server to the point that memory utilization was over 99%, taking out MySQL (not really sure why). My initial response was to enable the firewall ufw, and add each attacker to the list. I did consider disabling the xmlrpc service, but I didn’t feel great about removing a feature that I may want to use in the future.
Manually updating the firewall wasn’t very effective however, as the IP’s frequently change, and I have no warning of when it starts happening. So my next step was to install fail2ban. I configured fail2ban to block attackers after 3 failed attempts of calling the xmlrpc service. This was a much better approach, as I didn’t need to monitor the site, and my IP banned list wouldn’t grow very long (fail2ban reverses the ban after a period of time). But that still didn’t work. I mean, it was better, but my site was still going offline.
I considered adding more memory to the instance, but I felt that paying another $10 / mo for 2GB of memory was too much for a personal site. I learned that the swap file is disabled in DigitalOcean’s linux configurations, so I enabled it with 4GB. This helped some, but my site was still going offline at least once a week - and the swap file wasn’t even full!
At this point I was simply fed up with the platform, and not sure what to do next. I set up the blog for blogging, not dealing with attackers / server performance issues!
I was also getting fed up with writing technical articles in Wordpress. My initial Idea was simple:
This didn’t work as seamlessly as I would have liked. First, there is no way to directly upload from Google Docs. There used to be a feature for this, but it was removed a few years ago. So I ended up doing a lot of copying and pasting. For the plain text content this wasn’t too bad, but it was a small nightmare for code. In addition to frequent indentation issues, the wordpress editor frequently rewrote code like this: List<string> into: List<string%gt; not cool.
A few months ago I ran into a blog that used Jekyll + GitHub Pages. The initial feature that really turned me on was that the entire blog was hosted in a GitHub repo! Editing is done in MarkDown, in your editor of choice Visual Studio Code is a great choice for this as it has a built-in MarkDown preview mode.

Compared to WordPress, the killer feature of Jekyll is that there is no database! The site contents are all compiled into HTML during deployment, so the server only needs to serve HTML files - no server side rending per page request! The other benefit to this is that GitHub can apparently host these sites very cheaply, because GitHub Pages is free! And in the event I need more that what GitHub provides, I can deploy a Jekyll instance with most cloud providers (including Digital Ocean).
The only problem with Jekyll is that it isn’t extremly easy to set up a site. There are existing sites / layouts available, but they are nowhere near as easy to set up as say a WordPress theme. This is a small tradeoff though, as once the site is up and running you shouldn’t need to touch many configuration details. All told, it took me about 10-15 hours over the last two months to migrate my site.
An invaluable tool was Ben Balter’s Wordpress-to-Jekyll-Exporter. This easily converted all my WordPress posts to MarkDown files, and even kept the correct image links. The code snippets were a bit off, but that wasn’t a big deal to fix. It doesn’t fully convert to Markdown, as my posts still had several <spans>’s in the content, but this was way better than rewriting every single post…
I really wanted to like WordPress, and I do think it has it’s place. But for a small developer site, it really isn’t worth the effort needed to keep it running. Granted I could use wordpress.com as my host, but then I still have authoring issues.
On a postitive side, I learned a lot about Linux administration. It was actually kind of fun for a while - I’d see my site down, restart, and it would be down again within minutes (at the worst point). This involved a furious scramble trying to figure out WTH was going on - and lots of on-the-fly learning.
It’s also a good reminder for developers in general that you should assume that anything you put out there will be attacked. Of course, using a popular package with well-known attack surfaces doesn’t help, but you should always assume that some malicious person/bot is going to find your site, and will try to harm it. So you need to be prepared, and leaving things up to your friendly admin / ops staff is not a good strategy.
This article demonstrates a simple edit page in Angular. I’ve created a demo page using JSFiddle that implements the following:
Databinding is very straightforward. We store the current entity data in $scope.manufacturer, and then either set ng-model on the inputs or use the databinding `` markup. Changes to the inputs are (by default) immediately reflected in the model, and likewise changes to the model are immediately reflected in the inputs and other bindings. For the state dropdown, we use the lookup service to retrieve and bind the list of states.
A common pattern for data entry pages is to have both a view mode and edit mode. This is accomplished with a set of dynamic css classes on each of the related controls. To hide controls, we set display:none, which allows the control to be in the DOM but take up no space, as opposed to display:hidden
Most data entry pages will also contain the common CRUD operations - which we implement here except for deletion in the manufacturerController:
editManufacturer()newManufacturer()saveManufacturer()cancelEdit()These functions are responsible for setting the current editing mode, and managing the manufacturer buffer / binding. We don’t interact with the DOM except through the model. Notice in saveManufacturer() we check if the manufacturerForm is valid before saving. The form and its collection of bound values are added to the $scope by Angular, so we do not have to look up in the DOM. Last, look at the use of angular.copy(). Remember that $scope.manufacturer contains a reference to a JSON object. If we want to revert it back to the original values, we need to copy the values from $scope.manufacturerPrior. If instead, we set $scope.manufacturer = $scope.manufacturerPrior, we will have two members pointing to the same object, which isn’t what we intended. There will be a subtle error if we go in and out of edit mode. The first time, it will work as expected, since there are two separate objects, but the second time, the form controls will be bound to the same reference that $scope.maufacturerPrior holds!
In angular, filters are used to manipulate displayed data, either to supress data or to format data. In this example we use a filter to format currency and phone numbers. The currency filter is quite simple, simply specify the filter expression in the binding:
<span class="displayValue" ng-class="pageMode">{{manufacturer.creditLimit | currency}}</span>
Currency is one of a few default filters available in Angular. Others include:
Unfortunately these filters don’t work on input fields. To format data inside an input we will need to resort to custom javascript or find an appropriate library control.
We can also create custom filters, which I’ve done here for formatting telephone number using a sample filter from Stackoverflow. To do this you call the filter function on the main app module:
productManagerApp.filter("telephone", function () {
    return function(telephone){
        if (!telephone)
            return '';
        var value = telephone.toString().trim().replace(/^\+/, '');

        if (value.match(/[^0-9]/)) {
            return telephone;
        }

        ...

        return (country + " (" + city + ") " + number).trim();
    };
});
Here you specify the name of the filter telephone, then define a function that takes an input (bound data flowing through the filter) that returns a string output, in the desired display format. Once this is defined, the filter can be used in bindings as follows:
<span class="displayValue" ng-class="pageMode">{{manufacturer.faxNumber | telephone}}</span>
This allows for very clean usage and keeps the formatting logic out of the controller and view.
The edit fields are contained in an HTML form. Normally form submission causes a page postback to the server, but angular supresses this by default, unless the action attribute is specified in the form. Strictly speaking you can develop without forms in angular, but it is still helpful to do so, primarily for validation. Forms and their associated named controls have the following properties defined that can be programmatically accessed:
This allows us to check manufacturerForm.$valid or manufacturerForm.nameInput.$valid.
To submit the form, we set the ng-submit attribute of the form to saveManufacturer(). Interestingly we can simply change the save button to specify ng-click() and call the function directly. However it is better to use the form submission model if possible. Additionally the angular docs warns about using ng-submit and ng-click in the same context.
To prevent saving when validation fails, we use the ng-disabled attribute on the input button:
<button type="submit" class="editButton" ng-class="pageMode" form="manufacturerForm" ng-disabled="manufacturerForm.$invalid">Save</button>
This will visually disable the button as well as the enter submit action. It is also a good idea to check the valid status in the controller function as well
$scope.saveManufacturer = function () {
    if ($scope.manufacturerForm.$valid) {
        $scope.manufacturerPrior = {};
        $scope.pageMode = "viewMode";
    }
}
A word on button layout - for the ng-submit method to work, the button / input must be inside the form. This is not ideal for layout purposes, as you may want to keep all the action buttons together. However in this example, ng-click does not fire for the edit button while inside the form! There are a few workarounds for this. In newer browsers, you can use the form attribute on a button to trigger a submit from outside the form, but this does not work on IE11. These CRUD functions are too important to not work on IE, so that’s out. There are also a number of ways to trigger the submit via JavaScript, but I wasn’t able to find a reliable/simple one, and is outside the scope of this article anyway.
There are two types of validation on the page. The first uses the required attribute, which is fairly straightforward. To alert the user when they need to enter a required field, we place an error span after the form field, using the ng-show attribute:
<span class="error" ng-show="manufacturerForm.nameInput.$error.required">Name field is required</span>
By default an HTML5 form will display a warning popup on save, but since we are including custom messages here we can supress this by setting the novalidate attribute on the form.
The second type of valiation is a minlength and maxlength attribute on the account number field. There are two ways to set this, use either the minlength or the ng-minlength syntax. The difference I noticed was that with maxlength, you physically couldn’t type more into the field, whereas with ng-maxlength you were able to type unlimited chars (but the validation still failed if above the max length)
This article demonstrated a simple technique for a data entry form. Angular does an impressive job minimizing the amount of code in the controller needed to support the view and edit behaviors.