Brian Vander Plaats
Developer
Blog
Developer
This article demonstrates a basic technique for a search page in Angular. I’ve created a demo page using JSFiddle that implements the following:
This search page uses an all-at-once search technique where the application loads the entire data set first, then filters the results. This is a simplistic technique, which works for up to a few thousand records. The advantage is that once loaded, the data doesn’t need to be re-loaded when the filters change, which can make the search appear very quick to the user. I do not demonstrate any paging techniques here, and in my opinion, paging is something that needs to go away. Paging as a technique is largely a trick for reducing page bandwidth, and while I agree you can’t just load 10K items onto a page, it seems like many places where paging is used have < 1K records. As a user paging isn’t something anyone really wants. If someone sent you a spreadsheet of customers, would you rather have the list separated into multiple worksheets or one large list? Yet many sites still force the user thru multiple pages to get what they are looking for. Thankfully more sites now are starting to use an “infinite” scrolling technique, but that is out of scope for this article.
The data for the search page is stored in a static JSON collection in the main javascript file. In a production application, this would be retrieved by a service call to some API endpoint, but for testing, you will also likely have this as a separate JSON file that can be loaded for your unit tests. This is an extremely powerful technique. It allows us to build out the front-end before the back-end is available, which allows us to prototype and iterate much faster. Even after the back-end is available, the static JSON is still useful for unit testing.
To make the JSON available to the view, we create the controller: searchController and set the directive: ng-controller="searchController" in the view. This allows every child element to have access to the scope of this controller. For simple databinding, we either use the {{}} binding expression or set the ng-model directive, but since we have a list of items we want to databind, we need to use the ng-repeat directive:
    <tr ng-repeat="partNumber in searchResults">
        <td>{{partNumber.modelName}}</td>
        <td>{{partNumber.partNumberName}}</td>
        <td>{{partNumber.inventoryPartNumber}}</td>
        <td>{{partNumber.manufacturerPartNumber}}</td>
        <td>{{partNumber.partNumberStatus}}</td>
        <td>{{partNumber.modelCategoryName}}</td>
        <td>{{partNumber.partNumberListPrice}}</td>
    </tr>
The ng-repeat directive will iterate through each JSON object in the searchResults collection, and bind the {{partNumber.XXX}} expressions.
Adding a single text box filter is quite simple:
<input type="Text" ng-model="query" />

<tr ng-repeat="partNumber in searchResults | filter:query>
Each time the value in the <input> changes, angular re-binds the list, checking for the value of query in any of the string properties of partNumber, so you can essentially search every column with a single text box. If instead we want to search just a single field, we can set the filter expression as follows:
filter:{partNumberName:query}
This page also demonstrates multiple search fields, including “does not contain” fields. The neat thing is that you can specify the JSON property directly in the <input>, and still keep the filter expression simple:
<input type="text" id="modelContains" ng-model="query.modelName" class="includeInput"/>
<input type="text" id="nameContains" ng-model="query.partNumberName" class="includeInput"/>
Unfortunately the exclude filter is more complicated. With includes, a blank query value essentially matches everything, so by negating the blank value, you are filtering out everything! I found I needed to supply conditional logic to only apply the filter if the <input> contained a value. Additionally, you need to specify each filter field separately, so it is not as clean as the includes:
<tr ng-repeat="partNumber in searchResults | filter:query |
            filter: (exclude.modelName.length > 0 ? {modelName: '!' + exclude.modelName} : '') |
            filter: (exclude.partNumberName.length > 0 ? {partNumberName: '!' + exclude.partNumberName} : '') |
            filter: (exclude.inventoryPartNumber.length > 0 ? {inventoryPartNumber: '!' + exclude.inventoryPartNumber} : '') |
            filter: (exclude.manufacturerPartNumber.length > 0 ? {manufacturerPartNumber: '!' + exclude.manufacturerPartNumber} : '') |
            filter: (exclude.partNumberListPrice.length > 0 ? {partNumberListPrice: '!' + exclude.partNumberListPrice} : '')">
The advanced search mode contains two dropdowns for status and category. These come from the lookup service, which highlights how Angular wants you to think about separation of concerns. As you can see in the searchController, we just store the references to the lists retrieved from the lookup service - but we could just as well add these lists directly to the controller. But what happens if we want to include the category lists in another view? We would need to add the list to that controller was well - not good. By using the service, we can inject lookup everywhere it needs to be used. Additionally, at some point we may want to retrieve the category list from a database. A controller should absolutely not make any back-end calls to an API or database, as this involves configuration details that we won’t know until runtime. The controller’s job is to expose data and logic to the view - that’s it. It should be irrelevant to the controller where the data comes from.
Lastly, I demonstrate using the ng-class directive to apply dynamic CSS to the view. In this example, we have two search modes - basic and advanced. We need to hide components depending on the mode. First off, we do not want to do this in the controller! The controller should not touch the DOM at all - it should only operate on and communicate through the scope. Secondly, we want to use CSS classes instead of iterating through DOM elements. Here’s how the operation should look like:
<a href="#" ng-click="toggleSearch('advancedSearch')">Advanced Search</a>searchController updates the current searchMode, which corresponds to the CSS class name to activate:$scope.toggleSearch = function(searchMode) {
$scope.searchMode = searchMode;
$scope.query = '';
$scope.exclude = '';
}
searchHeader, searchFilter, searchResults have an ng-class directive, which can apply a CSS class. When $scope.searchMode changes, the classes for all three will be updated. Here is what the classes look like for the searchResults. In basic mode, this div takes up the full row from left to right, but when advancedSearch is active, we need to shift the div over.searchResults.advancedSearch {
margin-left:250px;
}
.searchResults.basicSearch {
margin-left:0px;
}
The power of this technique is that any time we want to add another UI component that behaves differently with the different modes, we merely need to define the appropriate CSS classes for the new component.
While simple, this example provides a basic template for setting up a search page.
AngularJS is a JavaScript framework developed by Google for front-end web development. It allows creation of a class of applications known as “Single-Page-Applications” (SPA). A SPA typically loads all required code (HMTL/CSS/JavaScript) in a single page request. In response to user actions, additional resources are loaded as necessary thru XMLHttpRequests / AJAX. There is no postback or transfer of control to another page - to the browser the user is simply sitting on / interacting with a single page. This architecture allows for a fluid, seamless feel to a web application, bringing it closer to what a native application feels like. While network latency is often a limiting factor in performance, traditional web applications exacerbate this by constantly loading/reloading application components, and processing presentation details on the server. In a SPA, shared components are typically loaded once, with page-specific content loading dynamically as needed(often only a few kilobytes).
AngularJS was written specifically for data-oriented applications, which most often refer to line of business applications (LOB). Realizing that a common need was writing data entry forms hooked up to databases, the Angular architecture was optimized for performing data binding operations. Additionally, Angular philosophy stresses strict separation of concerns and testability. It’s no secret that web applications (and business applications in general) are often bloated and buggy,and some of this can be blamed by poor platform architecture. Obviously no tool is going to make up for a poor development approach, but a goal of Angular is to make it easier to write better software for those that care about such things…
Let’s see what an angular application looks like. At the most basic level an application will look something like this:
<!DOCTYPE html>
<html ng-app="myApp">
  <head>
  </head>

  <body>
	<div ng-controller="defaultController">
	  <h1>{{greeting}}</h1>
	</div>

	<script src='https://cdnjs.cloudflare.com/ajax/libs/angular.js/1.5.2/angular.min.js'></script>
	<script>
		var app = angular.module('myApp', []);

		app.controller('defaultController', function($scope){

		  $scope.greeting = "Hello, World!";

		});
	</script>
	</body>
</html>
The main components of this application are:
When this page loads, the application module “myApp” is instantiated in the current browser context, and given a controller reference. Then, the HTML markup
is processed to reflect any data changes. It’s important to realize at this point that the page is already “loaded” as far as the browser is concerned.
Initially the section <h1></h1> is rendered as `` by the browser. When Angular runs, it sees this as a databinding, and replaces
this with whatever value the greeting attribute is on the current scope.
One implication of this is that you can have an Angular “application” pretty much anywhere you can serve an HTML page. For example, you could take a legacy ASP.NET application and replace the search page with an embedded angular application, or you could create an entire website composed of a collection of Angular applications.
Like any framework, Angular has a number of key terms you should be familiar with:
Angular is an opinionated framework - it was designed with certain principles in mind, and it strongly encourages you to follow those.
In Angular, it is very important that components do one thing well, and do not cross prescribed boundaries.
Angular uses the dependency injection pattern to pass services to controllers, filters, directives, etc. Controllers should never instantiate service objects directly. By following this pattern, you will ensure that your application components are as testable and as simple as possible. For example, having your controller open a connection to a service endpoint or database is considered bad practice. Where are you getting your server / url from? What if we want to hit the staging server instead of production?
This is the first of many posts exploring AngularJS. I’ll be going through the requirements for using AngularJS to create a typical line of business application. It should be note that at the time of this writing (May 2016), Angular is going through a large conceptual shift from 1.X to 2.X. I will be focusing on concepts related to 1.X, primarily as this is what I’m using to build production applications now.
In the next few posts, I will be exploring different authentication options for a simple front end/ back end app. What I would like to demonstrate is the following:
To do this I’ve set up a “Model Manager” website that has the following structure
Basic security is as follows
Other details
In the first example, I’ve explored the ASP.NET Identity authentication mechanisms, as well as OAuth 2.0.
Source code is up at github
ASP.Net Identity is the current out-of-the-box solution for ASP.NET website security. It is built on Entity Framework, and gives you a lot of flexibility in setting things up. With the default scaffolding that is part of the standard asp.net project template, it is very easy to provide a login mechanism for your users.
To use ASP.NET Identity, you need the following
Setting up the database & context proved to be the most challenging part of this process. The first step is deciding whether or not you want to use the ASP.NET Identity classes as-is, or to subclass. If you choose to subclass, you can add custom properties to the User class that will be present when the tables are created. The convention I’ve seen is to put this customization in an IdentityModels.cs here’s what mine looks like:
public class ApplicationUser : IdentityUser
{
 public async Task<ClaimsIdentity> GenerateUserIdentityAsync(UserManager<ApplicationUser> manager)
 {
 // Note the authenticationType must match the one defined in CookieAuthenticationOptions.AuthenticationType
 var userIdentity = await manager.CreateIdentityAsync(this, DefaultAuthenticationTypes.ApplicationCookie);
 // Add custom user claims here
 return userIdentity;
 }
}

public class ApplicationDbContext : IdentityDbContext<ApplicationUser>
{
 public ApplicationDbContext()
 : base("DefaultConnection", throwIfV1Schema: false)
 {
 }

 public static ApplicationDbContext Create()
 {
 return new ApplicationDbContext();
 }
}
The next option is to determine if you want to let the database creation happen automatically, or to enable migrations. I chose to enable migrations so I could create a Seed() method for setting up some default users & adding the ModelEditorRole. Frankly I’m not a fan of the implict table creation. During testing, I ended up creating the security tables inside the BikeStore database by accident. And while it’s kind of neat that the first time someone logs in the tables get created automatically, why would you ever have a real application deployed this way?
Once up and running, the logon process is very simple:

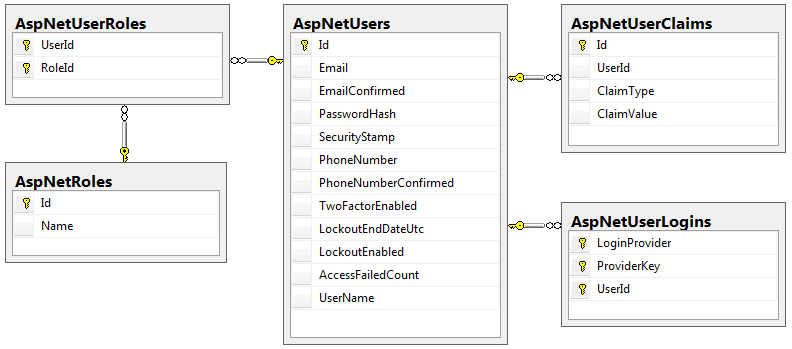
Here’s what a user looks like
![]()
The identity system is an effective choice to be sure, but what if you don’t want to manage user passwords, or you want the user to be able to sign in with their google, facebook, etc account? The answer is OAuth. OAuth is an open standard for authorization, that is supported by all the major providers. A website using OAuth can delegate user authentication to the service hosting the user’s account (i.e. Facebook). the OAuth standard defines how this should work. Digital Ocean has an excellent overview on Oauth 2.0.
To use OAuth, you must first choose a provider, and register your application. You must provide your application name, website, and a redirect URI. The provider will then provide you with a Client ID and Client Secret, which will be used by your application to authenticate itself with the provider.
Once configured, the application follows a special authentication workflow, generally initiated when the user tries to log in to your application.
Your application is not limited to a single provider - you could allow the user to authenticate with Google, Twitter, and Facebook, all at the sametime. However, you must decide if @brian is the same as Brian@gmail.com and brian@facebook.com. Of course you could choose to only allow a person to log in with one type of provider as well. The point being once you have an authorization token, your application can interpret / use that token as you see fit.
Out of the box ASP.Net supports Google, Twitter, Facebook, and Microsoft logins as authentication options. I’m using Google for this example. On the asp.net side, setting up google authentication is incredibly easy. You simply provide your google API key / secret in /app_start/Startup.auth.cs:
app.UseGoogleAuthentication(new GoogleOAuth2AuthenticationOptions()
{
 ClientId = "XXXXXXXXXXXXXXXXXXXXXXXXXXXXXXXXXX",
 ClientSecret = "XXXXXXXXXXXXXXXXXXXXXXXXXXXX"
});
Big warning right here. Do not actually put your API key in here! This must come from a configuration file, and that file must not be checked into your source code. Ever. Exposing your API key means other people can steal it and incur charges against your account. Hardcoding your API key means that if you need to change your credentials or they are shut off, your app simply stops working. Scott Hanselman posted a good article on this. Here I’m more or less following his advice. Just remember to avoid checking the secret file into any type of source control, and when publishing the file, encrypt it.
app.UseGoogleAuthentication(new GoogleOAuth2AuthenticationOptions()
{
 ClientId = System.Configuration.ConfigurationManager.AppSettings["GoogleClientId"],
 ClientSecret = System.Configuration.ConfigurationManager.AppSettings["GoogleClientSecret"]
});
Publishing to Azure, the Google API Key is in the application settings configuration panel:

The bulk of the work involves setting up your google account to allow your website to talk to google. I’m following the steps outlined in this article. I will show you the steps I took here, but keep in mind that Google can change their services at any time. This is the main trade off to using a third party, you simply don’t have control over what they do on their end. The good news is that 3rd party authentication is really popular, and doesn’t look to be going away any time soon…
Step 1: Create a new project
Step 2: Create credentials
Step 3: Define Acceptable Javascript origins and Redirect URI’s
Step 4: Enable the Google + API
This is not enabled by default, and authentication will fail if it is not
Step 5: Get your provided ClientID / Secret and add them to your application
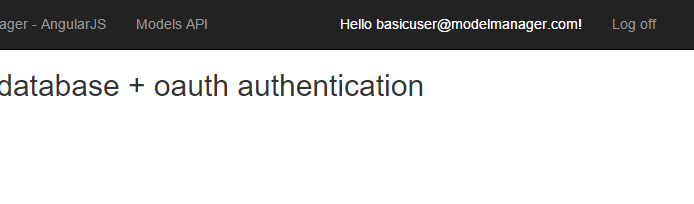
After configuration, you may attempt to log into the site with your google account.
The default behavior of the identity system is to redirect the user to the logon page whenever they hit a route that requires authorization. This is very useful for someone who is not logged in, but what happens when someone not in the ModelEditorRole attempts to edit a model? They get redirected to the logon page again. This is confusing for the user, since they’ve already logged in.
The solution for this is relatively simple, but disappointing. I can’t imagine a production application that would use the standard redirection as-is, so having to create a custom filter just to fix this issue is irritating.
From this Stack overflow answer:
public class AuthorizeRedirectMVCAttribute : System.Web.Mvc.AuthorizeAttribute
{
 protected override void HandleUnauthorizedRequest(AuthorizationContext filterContext)
 {
 base.HandleUnauthorizedRequest(filterContext);

 if (filterContext.RequestContext.HttpContext.User.Identity.IsAuthenticated)
 {
 filterContext.Result = new RedirectResult("~/Account/AccessDenied");
 }
 }
}
Then, change your decorations from [Authorize] to [AuthorizeRedirectMVC].
Additionally, you need to implement another [Authorize] filter for your API routes, as they do not use the same AuthorizeAttribute class.
public class AuthorizeRedirectAPIAttribute : System.Web.Http.AuthorizeAttribute
{
 protected override void HandleUnauthorizedRequest(HttpActionContext actionContext)
 {
 base.HandleUnauthorizedRequest(actionContext);

 if (actionContext.RequestContext.Principal.Identity.IsAuthenticated)
 {
 actionContext.Response = actionContext.Request.CreateResponse(HttpStatusCode.Forbidden);
 }
 }
}
With the two authentication mechanisms available, let’s look at how the application works with these.
First, any time a user tries to access a route that requires a role or authentication, the application will automatically redirect to the logon screen.
All WebApi Routes are set with a default Authorize and Require HTTPS Filter. As mentioned in a previous blog, Service endpoints should never be served over unencrypted HTTP.
public static class WebApiConfig
{
public static void Register(HttpConfiguration config)
{
 // Web API configuration and services
 config.Filters.Add(new AuthorizeRedirectAPIAttribute());
 config.Filters.Add(new RequireHttpsAttribute());
The ASP.NET MVC Controller for Models use a [Authorize] attribute for the entire controller, and an Authorize(Roles) for the editing routes
namespace ModelManagerOAuthIndividual.Controllers
{
[AuthorizeRedirectMVC]
public class ModelEditorController : Controller
{

...

[AuthorizeRedirectMVC(Roles = "ModelEditorRole")]
public ActionResult Create()
{
...
The Angular portion is served by an MVC Controller that has the authorize attribute. Within the Angular routes we do not have access to the [Authorize] filters. To add granular security within the Angular app, I created an API Security Controller:
public class SecurityController : ApiController
{
// /api/security/UserAuthenticated
[HttpGet]
[AllowAnonymous]
public bool UserAuthenticated()
{
 return RequestContext.Principal.Identity.IsAuthenticated;
}

// /api/security/UserInrole?rolename=ModelEditorRole
[HttpGet]
[AllowAnonymous]
public bool UserInRole(string roleName)
{
 return User.IsInRole(roleName);
}
}
Inside the Angular controller, we make the security check as the user attempts to access edit mode on the model detail controller
$scope.enterEditMode = function () {

$http.get("/api/security/UserInRole?roleName=ModelEditorRole").success(
 function (data) {
 if (!data) {
 // note can't use $location.path here, as the MVC Access denied page is "outside" of the
 // angular app, and $location.path always prepends a leading '/', so you need to use window.location.href
 window.location.href = $location.absUrl().split('ModelEditorAngular')[0] + 'account/accessdenied';
 }

 $scope.inEditMode = true;
 });
}
Remember that the actual API calls to access/edit the model data are still secured through our filters. This is an important point - you need to implement security on both the client and the API calls.
ASP.NET give you a lot of flexible tools for configuring different authentication options. For a public site, a good strategy would be to include the following security:
It should be noted again that OAuth implementations are not static, and it’s very possible that OAuth is deprecated at some point in the future. At the very least, you don’t want your site to stop working because google or facebook make a change! The other tradeoff is that if these services have downtime, it will impact your users. But the number one reason for using OAuth is simply convenience for your users. It’s more likely that a user will forget their login / password than google or facebook to be down. I would argue that OAuth is less secure - as it basically allows users to use the same key on many doors. Implementing OAuth for a financial institution would be a bad idea - that’s basically giving the provider access to that account. In general, most sites on the Internet would benefit from allowing OAuth.
In the previous article on Web API, I demonstrated simple CRUD operations. In this article I implement a security scheme using Basic Authentication. While investigating authentication options, I was first dismissive of Basic Authentication. Sending credentials with every request that could easily be read doesn’t seem like a very secure approach. Then I found a blog post by @rdegges that raised some good points. Essentially, basic authentication can be a valid technique if you:
However, if you’re planning on using the API as a back end for a front-end client, basic authentication is not a good choice. Somewhere, your JavaScript will need to set the credentials on the API call, and to my knowledge, you can’t easily (possibly?) store that on the client in a secure manner. In these cases you should stick to a session ID / token approach. To put it another way, Basic Authentication should not be used unless the credentials can be stored in secure manner. Later on I demonstrate this on the server end using a pass-thru API call, as if I was calling some third party API service on behalf of the client.
Source is up on Github
Setting up basic authentication was slightly complicated. The Web API / MVC frameworks do not support basic authentication as one of the default wizard options - you need to include custom code in your app. You have the choice of either writing a custom HTTP Module, or using the newer Web API Filter approach. I ended up using this BasicAuthenticationAttribute filter from www.asp.net / Codeplex.
Additionally, I also wanted to force HTTPS, and I was able to find another filter to copy from this www.asp.net article.
The basic security scheme I used is as follows:
To use the identity database, I created a new security context and database. I added the users in the seed() method and updated using migrations.
The controllers are essentially the same as in the prior article
Each controller has been decorated with three attributes
namespace WebApiBasicAuthentication.Controllers
{
 [IdentityBasicAuthentication] // Enable Basic authentication for this controller.
 [RequireHttps]
 [Authorize] // Require authenticated requests.
 public class ModelsController : ApiController
 {
For the restricted controller, you simply include the roles in the Authorize Attributes
namespace WebApiBasicAuthentication.Controllers
{
 [IdentityBasicAuthentication] // Enable Basic authentication for this controller.
 [RequireHttps]
 [Authorize (Roles = "AdvancedUserRole")] // Require authenticated requests + user in specified role
 public class PartNumbersController : ApiController
 {
The new controller I added to this project was to demonstrate calling a third party service. As I mentioned earlier, this would be a valid place to call an API using basic authentication, as the client has no knowledge of the credentials. In this case the “third party service” is simply another controller in the project, but you get the idea.
namespace WebAPIBasicAuthentication.Controllers
{
 public class PartNumberPassThruController : ApiController
 {
 public async Task<HttpResponseMessage> GetPartNumbers()
 {
 HttpResponseMessage response = null;
 string json = "";
 string apiKey = "7f5645122a634577a53dca81359138b6";
 string apiSecret = "3186b763ddb4405bbf0b0d0eac5892cf";

 using (var client = new HttpClient())
 {

 client.BaseAddress = new Uri(Request.RequestUri.GetLeftPart(UriPartial.Authority));
 client.DefaultRequestHeaders.Accept.Clear();
 client.DefaultRequestHeaders.Accept.Add(new MediaTypeWithQualityHeaderValue("application/json"));
 client.DefaultRequestHeaders.Authorization =
 new AuthenticationHeaderValue(
 "Basic",
 Convert.ToBase64String(
 System.Text.ASCIIEncoding.ASCII.GetBytes(
 string.Format("{0}:{1}", apiKey, apiSecret)))
 );

 response = await client.GetAsync("api/PartNumbers");


 if (response.IsSuccessStatusCode)
 {
 return response;
 }
 }

 return Request.CreateResponse(HttpStatusCode.NotFound);
 }
 }
}
If the third party api returns JSON, you may choose to pass this directly to the client. Or, you may choose to load into objects for further manipulation, filtering, etc.
The website root contains a number of sample tests
https://localhost:44300/api/models
If you access this before other tests, you will be prompted to enter a username / password.
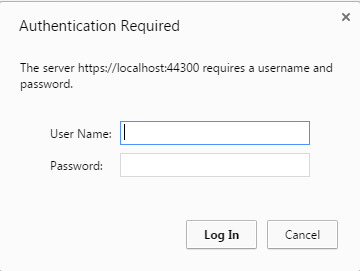
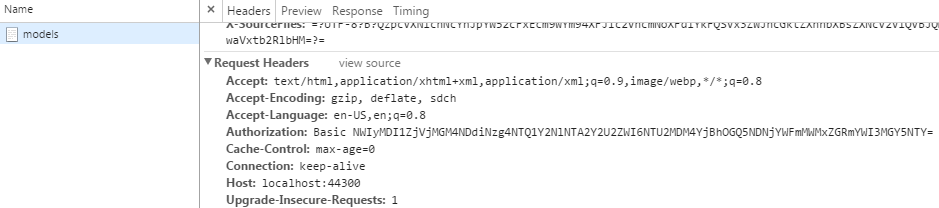
With basic authentication, the browser caches those credentials, and they will be sent with each request.
Here’s what the header looks like (remember that the string after Basic is simply a base64 encoded version of the username/password):
//General User
var apiKey = "5b2025f5c0c847b788545cce506ce6eb";
var apiSecret = "556038b0a8d943caaf1c1ddfab70f956";
$.ajax({
type: "GET",
url: "/api/models",
dataType: "json",
async: false,
username: apiKey,
password: apiSecret,
data: "",
success: function (data) {
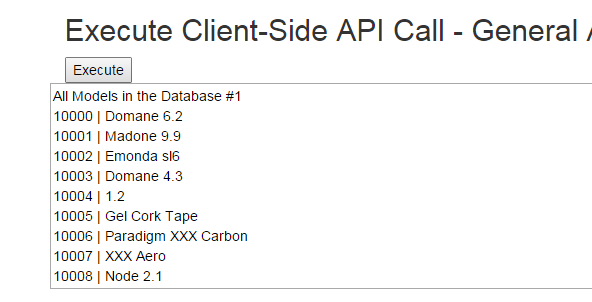
$('#ClientOutputGeneralAccess').html("");
$('#ClientOutputGeneralAccess').append('All Models in the Database #1 \r\n');
$.each(data, function (key, item) {
$('#ClientOutputGeneralAccess').append(item.ModelId + " | " + item.Name + '\r\n');
});
},
error: function (XMLHttpRequest, status, error) {
$('#ClientOutputGeneralAccess').html("");
$('#ClientOutputGeneralAccess').append(status + " " + error);
}
});
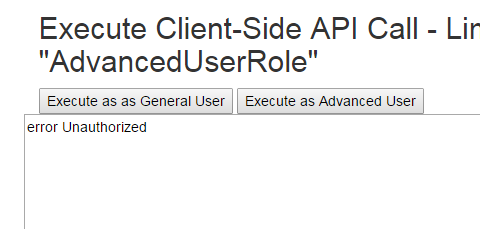
The /api/PartNumbers route is restricted. The first part of this test demonstrates what happens when a user not in the AdvancedUserRole tries to request this route.
// general user
var apiKey = "5b2025f5c0c847b788545cce506ce6eb";
var apiSecret = "556038b0a8d943caaf1c1ddfab70f956";

$.ajax({
 type: "GET",
 url: "/api/PartNumbers",
 dataType: "json",
 async: false,
 username: apiKey,
 password: apiSecret,
 data: "",
 success: function (data) {
 $('#ClientOutputLimitedAccess').html("");
 $('#ClientOutputLimitedAccess').append('All Part numbers in the Database \r\n');
 $.each(data, function (key, item) {
 $('#ClientOutputLimitedAccess').append(item.PartNumberId + " | " + item.InvoiceDescription + '\r\n');
 });

 },
 error: function (XMLHttpRequest, status, error) {

 $('#ClientOutputLimitedAccess').html("");
 $('#ClientOutputLimitedAccess').append(status + " " + error);
 }
});
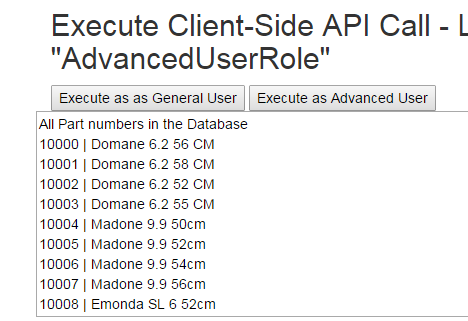
Now the call is made using credentials in the AdvancedUserRole:
//Advanced user
var apiKey = "7f5645122a634577a53dca81359138b6";
var apiSecret = "3186b763ddb4405bbf0b0d0eac5892cf";


$.ajax({
 type: "GET",
 url: "/api/PartNumbers",
 dataType: "json",
 async: false,
 username: apiKey,
 password: apiSecret,
 data: "",
 success: function (data) {
 $('#ClientOutputLimitedAccess').html("");

 $('#ClientOutputLimitedAccess').append('All Part numbers in the Database \r\n');
 $.each(data, function (key, item) {
 $('#ClientOutputLimitedAccess').append(item.PartNumberId + " | " + item.InvoiceDescription + '\r\n');
 });

 },
 error: function (XMLHttpRequest, status, error) {

 $('#ClientOutputLimitedAccess').html("");
 $('#ClientOutputLimitedAccess').append(status + " " + error);
 }
});
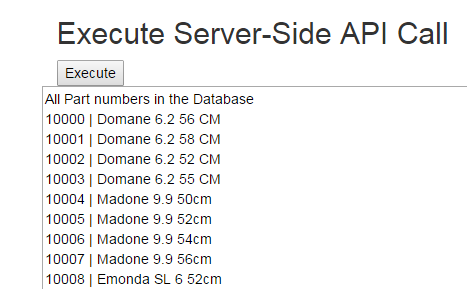
Test #4 - Execute a Server-Side API call
The final test is for the pass-thru call. Notice there is no API key / credentials in this call. The restricted /api/partnumbers route is being accessed on the server.
// server side call
$.ajax({
type: "GET",
url: "/api/PartNumberPassThru",
dataType: "json",
async: false,
data: "",
success: function (data) {
 $('#ServerOutput').html("");


 $('#ServerOutput').append('All Part numbers in the Database \r\n');
 $.each(data, function (key, item) {
 $('#ServerOutput').append(item.PartNumberId + " | " + item.InvoiceDescription + '\r\n');
 });

},
error: function (XMLHttpRequest, status, error) {

 $('#ServerOutput').html("");
 $('#ServerOutput').append(status + " " + error);
}
});
Usually when working with ASP.Net Identity all the necessary components are added with the existing project scaffolding, but recently I needed to add an Identity database to an existing project. Below is simple way to accomplish this.
From the Package Manager Console run:
Install-Package Microsoft.AspNet.Identity.EntityFramework
(this will install AspNet.Identity.Core as well)
Create a new empty Entity Framework Code First context. Replace the default class definition with:
...
 using Microsoft.AspNet.Identity;
 using Microsoft.AspNet.Identity.EntityFramework;

 public class SecurityDbContext : IdentityDbContext<IdentityUser>
 {
...
Update your web.config file to point the new context to a valid SQL Database.
note – If your context class overrides OnModelCreating, make sure base.OnModelCreating() is called
In Package Manager Console run:
Enable-Migrations -EnableAutomaticMigrations
Then, optionally, you can create additional users or roles as needed in \Migrations\Configurations.cs:
protected override void Seed(MyApplication.Models.SecurityDbContext context)
 {
 var um = new UserManager<IdentityUser>(new UserStore<IdentityUser>(context));

 var user = new IdentityUser()
 {
 UserName = "admin"
 };

 IdentityResult ir = um.Create(user, "1234#abcD");

 }
In Package Manger Console run
Update-Database
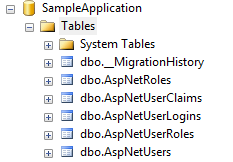
The Identity tables should now exist in the database: